Canopy from the sail
There are many options
We will look at how to protect yourself from bad weather when spending the night in nature. The firmest belief that it will not rain will take up the least space in the backpack (at best, faith in the weather forecast). But that doesn’t always work. Then there’s the prankster, the waterproof bivouac bag. The waterproof and airtight version is really only for emergency use, because it condenses moisture and the sleeping bag will be wet anyway. The disadvantage of waterproof but breathable irons is the high price. In addition, the transition between marching in the rain and sleeping in žďárák is also not very comfortable. In the same weight category, a poncho or light sail canopy is intended for its construction. The shelter is my favorite variant, it is light, but you can also weather a real storm in the dry. The rest of this text deals with various possibilities for the construction of shelters. There are tents at the end of the weight scale. A good tent protects against rain, snow, storms, mosquitoes and wild animals of smaller dimensions. However, it is unnecessarily difficult for shorter trips, especially when it is possible to camp in the woods.
Sail
I consider the canopy to be more historical equipment (forgiveness of the rock trumpet). The cotton canvas tent is not only terribly heavy, but also large enough to create a functional shelter in any weather. However, a shelter for two can be built from two shelters. The advantage of the canopy is its breathability, so light rain, morning dew or just cold can be survived by simply covering the canopy.
Poncho
A poncho is an extremely practical piece of equipment because it can serve many purposes. But now we are interested in the construction of a shelter, we will keep the boat for another time, not to mention the raincoat. Some ponchos are more suitable for shelters than others. The longer the poncho, the better. It is good to take this into account when making a poncho, a long poncho will also cover the backpack better. If a longer poncho interferes with walking in front, it can be shortened by bending, for example, by button fastening.
From the poncho, unlike the tent, it is possible to build a shelter that will protect one inhabitant from bad weather (if it is built well). But it is much better to connect two ponchos, three people can sleep in such a shelter, because the ratio of dry area in the middle to the wet edges is much greater. Also, such a shelter is taller, and therefore more comfortable. Some ponchos can be connected, but most of them flow through such a connection. Therefore, it is better to cover one poncho over another, but it requires more cords. Detailed construction instructions will be found a little further.
The roof that is right
It is best to prepare a shelter designed for this purpose. We don’t have to worry about how to connect the poncho so that it doesn’t get inside, how to close the hood at the poncho (or open it for a submachine gun on a tent) and so on. The poncho is multi-purpose, but the tarpaulin is lighter and in combination with waterproof clothing will allow you to build a shelter and not get wet. The ideal size of such a sail is about 3 x 3 meters. Three people with backpacks can comfortably grow under such a shelter. With such a sail, we survived many storms in the Romanian mountains, in the drought we also survived a downpour in combination with the wind, which almost demolished the shelter. The tarpaulin should be provided with eyelets or loops not only in the corners, but at least in the Middle Ages. We can easily make a tarpaulin for one person by edging a three-meter piece of waterproof rustle, which we provide with loops. A normal fabric width of 1.6 meters is sufficient. The larger leaf should be sewn from two strips.
Cords
Only the most advanced woodsmen, who have already mastered the distribution of fire by sight, can just hang the shelter in the air. The rest of us use cords, supported trees or stick structures. Anyone planning to build a shelter should have enough strings to build it. The knotter is not enough, even if shoelaces are added to it. The threads from the hood can’t stand much. The minimum for a normal shelter is one long cord (8-10 meters, diameter 3 mm), which stretches between the trees and forms the ridge of the roof, and six shorter, thinner cords (length 1.5 meters, diameter 2 mm) to turn off the corners and sides of the shed. The cord should have as little elongation as possible to keep the shed pretty taut.
Pins
Sometimes it is worth taking a pair of light tent pegs with you, but changing it is not a problem to make you take pegs from the sticks found on the spot. We leave the production of complex pins with hooks for the cord to the readers of the Tábor Encyclopedia; in practice, a focused (and sometimes not even) straight and firm stick is enough. To prevent the cord from slipping, we stick it into the ground at an angle.
Where to build?
There are several criteria that would prepare the technology to meet the site. We only sleep well on a flat place without stones and roots. Dry leaves or needles in the woods are ideal, lying down in high wet news is not pleasant. If we wish to work with the construction of a self-supporting structure, then we have chosen a place with suitably placed trees, between which we stretch the shelter. He tries to look for such a place when we have a long enough cord. Such a place will guarantee us a comfortable sleep and easy construction, but no longer the fact that we stay in such a case will rain. The tarpaulin of the shelter protects against water falling from above, but water can also come from elsewhere. The orientation of the shelter towards the wind plays an important role. The shelter should be built with its best wall against the wind. If we are expecting a strong wind or we have a large enough sail, we wind the windward side straight to the ground.
Water can get into our shelter even on the ground. Therefore, we will not build it in a depression that turned into a pond during the rain, or in the depressions in the slope that turned into a stream. Even on the plain, he chooses a place that looks really drier and not like a temporarily dry swamp.
Finally, one more important thing for choosing places in the forest: it is not completely healthy to sleep under naked dead trees, trees through which heavy dry branches can fall in the wind, and so on.
Types of shelters
There are a huge number of ways to build a shelter, now let’s look at some of the most useful types and one example of how not to do it.
Under the letter a) we find the basic construction in the picture – ace. Its main advantage is that it provides good protection from two long sides, so it is suitable for bad weather. It is easy to build, we just need a long line through which we throw the sail. From a narrow sail or poncho, however, we get a low shelter, which will not be very comfortable and will not fit well into it, but even that is better than getting wet. The worse the conditions, the lower the shelter we build so that it doesn’t blow too much under it. Acko is also the best option for building from a larger sail or connected ponchos.
The simple shelter in figure b) is suitable either for better weather or for places where we have one side protected otherwise. Sagging of the tarpaulin can be prevented by turning its center (for example, the poncho hood) to the side. Even so, this construction is not suitable for large sails because it is not stable enough.
With an absolute minimum of cords, we can build a shelter according to Figure c). But we need a fairly long rectangular sail, there will not be enough space under the short one. The disadvantage is also the high open side, but this can be improved, for example, by hanging the jacket to the top.
And finally, how not to do it, picture d) or bath. The walls of the shelter should be sloping enough for water to run out, even if it sags a little, so it is better to use a different construction than to try on a flat roof.

to build a shelter
Shelter of two ponch
Although a functional shelter can be built from one poncho, if it is to be reliable even in wind and rain, it must be as low as possible (edges no higher than twenty centimeters above the ground). But then it’s not exactly comfortable, you usually can’t even sit in it. Therefore, it is better to combine two ponchos, the resulting shelter is luxuriously spacious for their two owners. They can even hire a tenant, such as someone who doesn’t have a poncho, because they told him in the store that a gore-tex jacket is better for the rain. Or they can pin the edges of the ground on such a large shed to keep them from blowing. Although some ponchos can be connected with zippers or buttons, the resulting seam is not waterproof and would flow in inside anyway. Therefore, it is necessary to overlap the edges of the poncho, as in the following picture. First we tie one poncho to the stretched main line, and then we fasten the other through it. Usually a few extra pins are needed to keep everything in the right place.
built from one poncho
Advanced tips and tricks
In case of lack of trees, it is necessary to build a self-supporting structure. The picture shows two options: using one (left) and two bars (right). The two-bar version is much more stable and easier to build. In both cases, we need to tighten the mains cord properly, so we need to use really good pins. When one tree is available, we use it and only one end of the shelter will be a bar structure. This is sometimes useful in the woods, where there are plenty of trees, so we can choose a better place to sleep.
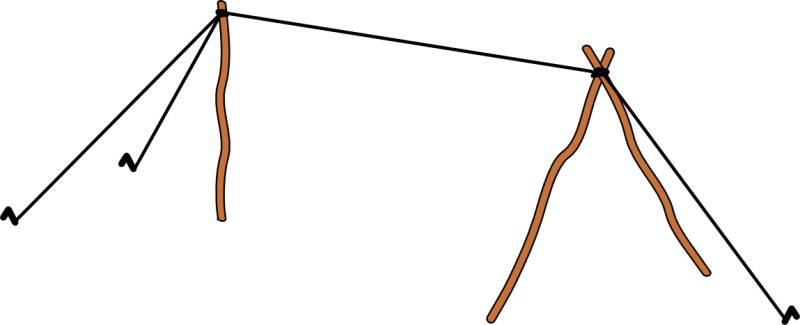
The two-bar version is much more stable
Attaching the sail to the main line. If we are building a shelter from a larger tarpaulin, it is better to first fasten the centers of the sides of the tarpaulin to the main line, and only then to stretch the corners. This not only forms a building for us, the shelter will also be stronger. The prussian knot, which connects to the nasal cords, is suitable for this. With the free end of the auxiliary line, we then tie the sail to the line with a free loop (picture). Before we tighten the prusik, we can move it arbitrarily, and thus place the sail where we want. Holds well after tightening.
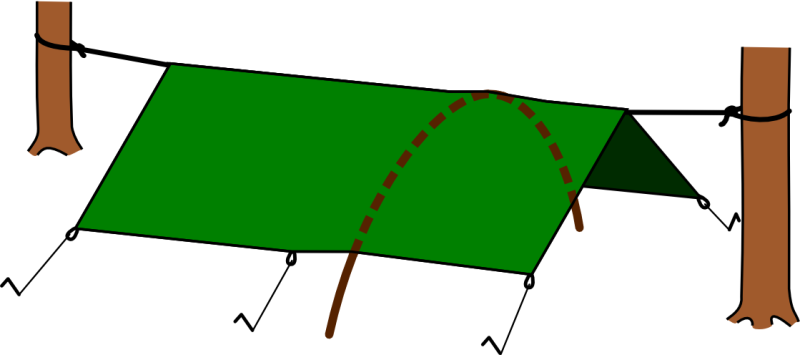
The shelter from the poncho for bad weather must be low so that it does not blow into us from the sides. The following tricks will help make him at least a little more comfortable. The shelter does not have to be the same height at both ends. The end where we will have our legs can be made lower, the corners of the poncho can be pinned to the ground. A sagging tarpaulin can take up a lot of space. That’s why we try to stretch it as best we can in as many points as possible – just the corners are not enough. If the poncho does not have other loops or eyelets in the middle of the sides, it pays to add your own. Another way to make the shelter more spacious is to make the triangular profile of the roof an arch, at least where we need some extra space the most. To do this, we use either a flexible rod or a curved branch.
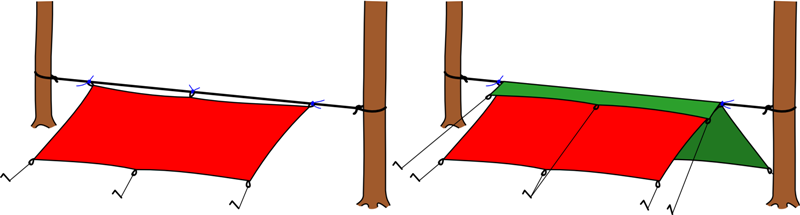
Another wall made of a poncho is an opportunity to improve the shelter from a large sail, if we also have a poncho with us. The added wall significantly increases the area protected from rain, especially when it blows. Because the poncho does not have the right shape, we will not stretch it by its corners, but by the centers of the sides. So we get the diamond we need.